Welcome to part 6 of my Unity 5 basic networking tutorial, in this part we will add scores and respawning.
Part6a – Death and respawning
In the last part of the tutorial, we left it where a player’s health reduced when hit by a laser shot, but it didn’t detect when it reached zero. So we need to address that now.
Firstly open the HealthAndDamage script in your editor and change the replace the TakeDamage() function with the following new TakeDamage() function.
What this does is prevent the health value from going below zero.
Then if it is zero it calls the DoDeath routine to take the appropriate action, which in this case will be to move the player to one of the spawn points and reset their health to 100.
We need to add the DoDeath() function next, so add this code just below the TakeDamage() function.
We also need a new SyncVar to store the respawn point in, so add this code just below the health SyncVar.
All the above bits of extra code do is call another two functions, which we will add next, one to obtain the new spawn point, which is then stored in the respawnPos syncvar and the other is an RPC to move the player to the respawn point.
We mark the DoDeath() function with the [Server] attribute as we only want respawning to be handled on the server.
Add this code just below the DoDeath() function, this is what we will use to get a new spawn point, it makes use of the spawn points we set up in the NetworkManager previously.
Lastly we need to add the HandlePlayerDeath() function as so
This is the function that does most of the work of respawning our player. Firstly we check isLocalPlayer, as we only want this to run on the local player object (it will automatically synchronize the changes to remote clients).
Then we reset our position to the respawnPos value obtained earlier, and finally we tell the server to set our health back to 100.
This is the entire HealthAndDamage script as it now stands
Save this and build and run the game, you will see that when a player’s health reaches zero, it is instantly respawned in one of the spawn points and it’s health is restored to 100.
Part 6b – Scoring
The only thing left for this part of the tutorial is to handle scoring when a player gets a kill. So we’ll sort that out now.
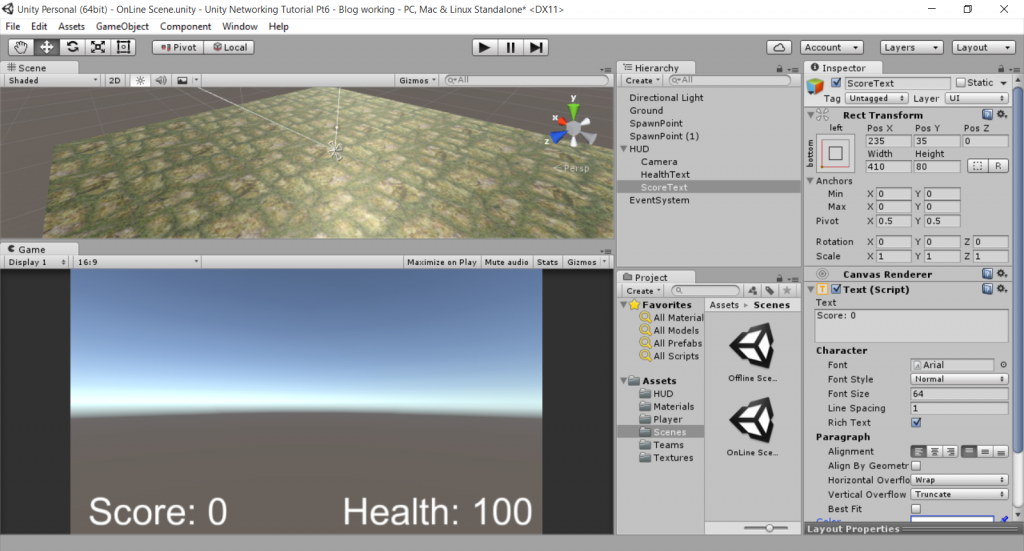
Firsly we need to update the HUD to give it a way of displaying our score. So open up the Online Scene, and with the HUD game object selected add a Text object (GameObject->UI->Text) and rename it ScoreText, then make the following changes to its properties:-
- Anchor = Bottom Left
- Position = 223, 35, 0
- Width = 410
- Height = 80
- Text = Score: 0
- Font Size = 64
- Colour = white
Once you’ve done that your Online scene should now look like this

Now we’ve got somewhere to display the score, we need to add some code to actually do that, but before we go on, save the scene with the above changes.
With the scene saved, the next thing we need to do is add a reference to the ScoreText game object and a new function to the HUD script. So open the HUD script in your editor.
Then add this line just below the healthText variable
Text scoreText;
Now add this line to the Awake() function
Now add the function that we can use to display the score for the player as it changes.
The entire HUD script should look like this now:-
Next, open up the HealthAndDamage script in your editor and add the following line to TakeDamage() function:
fromPlayer.GetComponent<PlayerShoot>().AddScore();
so the TakeDamage() function should now look like this:-
This calls the AddScore function on the player that fired the laser, if the targeted player’s health is zero, i.e. he is dead.
We now need to make the AddScore function as it doesn’t actually exist yet. So open the PlayerShoot script in your editor and add the following code beneath the CanFire() function:-
We also need to declare a variable to store the player score in, so add this line just below the nextFireTime variable:-
int score;
We are only interested in keeping track of the player’s score on the local player, so the score variable doesn’t need to be a SyncVar.
The AddScore function has to run on the server, as it invokes the RpcAddScore() RPC function we just added.
In the RpcAddScore() function we check it its running on the local player, as this is the only place we want to update the score, and if it is, we add 5 to the current score and then call the HUD.DisplayeScore() function we made earlier, to display the new score.
This is the entire PlayerShoot script with the above changes implemented:-
Save the PlayerShoot script and the HUD script, load the offline scene and then build and run the game. Now when you shoot and kill an opponent, you will see your score increase by 5 each time.
That’s it for part 6, in the next part we’ll improve the respawn function to add some delay and add health pick up items.

Hi im following your tutorial and i have ran into a problem. I get this DebugLog yellow warning that my [Server] function is being called on the client. I have the Addscore function with all of the needed network components added, but it seems that dispite putting the “[Server]” piece over my “Addscore” function, it still says that its being run on the client. By the way, this script is being ran on my player prefab and the network ID of that player prefab is local authority just like yours. I would appricate some help on this one.