Welcome to part 5 of my Unity 5 basic networking tutorial, in this part we will add damage and health, so at least your laser will have some purpose now!
Before we get to the laser, I want to make a small change to the NetworkPlayer script, with the addition of two lines. So open the NetworkPlayer script in your editor and add these two lines to the OnPlayerIDChanged() function:-
name = playerID;
if(isLocalPlayer) name += “ Local“;
This makes it much easier to identify whether you are dealing with your local player object, or the player object belonging to a remote player, when it comes to debug.logging etc. It’s a little trick I use when programming a multiplayer game, and can be a real time saver when trying to pin down why something isn’t working as it should.
The OnPlayerIDChanged function should look like this now
Save the changes and then we can move on to the laser, making it do some damage.
Part 5a – Laser hit detection and health
So the first thing we need to do is enable the laser to detect if it has hit another player. We’ll use a ray cast for this and therefore we need to add these lines to the beginning of the Fire() function in the PlayerShoot script:-
What this does is fire a ray in the same direction and length as our laser LineRenderer and, if it detects a hit, it calls the server function CmdDoShotSomeone() and passes references to both the player that was hit, and the player that did the shooting, so that the server can take the appropriate action. Which in this case will be to reduce the health of the player that was hit.
Again, to keep things simple there is no checking done to determine if the object that was hit is actually a player. For this tutorial that’s all it can ever be, but in practice you’d probably want to make certain with some tag checking etc.
Also in terms of reducing the chance that players can cheat, the hit detection really ought to be carried out on the server. However, without extra client side code being implemented, this could result in it looking like shots miss, when the client sees a hit, but due to the latency, the server doesn’t register a hit and vice versa. So for this tutorial I’ve decided to ignore the possibility of cheating and implemented it the way that will give the best player experience, whilst keeping the code as simple as possible.
However, we do need to make the CmdDoShotSomeone() function, so also in the PlayerShoot script, add the following function just below the Fire() function
This gets a reference to the HealthAndDamage script on the player that was hit, and calls the TakeDamage() function that will reduce the players health. It also passes a reference to the player that did the shooting, as this will be needed later. We can’t call this function directly from our Fire() function because we don’t own the hitPlayer gameobject; it belongs to another player in the game, therefore the only way we can interact with it is via the server.
The full PlayerShoot script should look like this now, save this (ignore any errors regarding the HealthAndDamage script being missing) and we’ll move on:-
Now we need to make the HealthAndDamage script, as at the moment it doesn’t exist.
So in the Assets/Player folder create a new script and rename it HealthAndDamage. Open it in your editor and replace the default code with the following:-
So going through this one bit at a time, first of all we declare a variable to store our health in, and make a SyncVar with a hook, OnHealthChanged().
Lets take a look at the hook; What this does first is update the health variable to reflect the new value, then it checks to see if health is less than 100. If it is then that means we have taken some damage, so we should show some kind of feedback to indicate this, and to do that we start a coroutine ShowHitEffect().
ShowHitEffect is quite simple, it gets a reference to our player object’s material, saves the current value of its colour, and then sets its colour to yellow, waits for a short time and then resets the colour using the previously saved value.
So basically, when you get shot, your player flashes yellow briefly.
In OnStartLocalPlayer() we call the server command CmdSetHealth, passing in a value of 100, this sets our starting health when joining the game. Because of the ‘If(health<100)‘ check in the hook function, changing our health like this won’t trigger the hit feedback effect when the health value changes. If we didn’t have that check in place, we would flash yellow when our health was initialized to 100 when we joined the game.
The remaining function is the TakeDamage function, which reduces our health by 10 every time it is called. It is this function that is called by the PlayerShoot script, when a hit is detected.
With all the changes above made, save your script and then add it to your player prefab, by dragging the script onto the prefab in the project window.
Now if you build and run the game and start a host and client, you’ll see that every time you score a hit on your opponent he flashes yellow. If you run one game in the editor you can also check the value of health in the inspector for each player, as it was declared as a public variable, and you’ll see it reduce as you score hits.
Part 5b – HUD
Now we need some way to display our health on screen, and the way we’ll do this is with a scene object HUD.
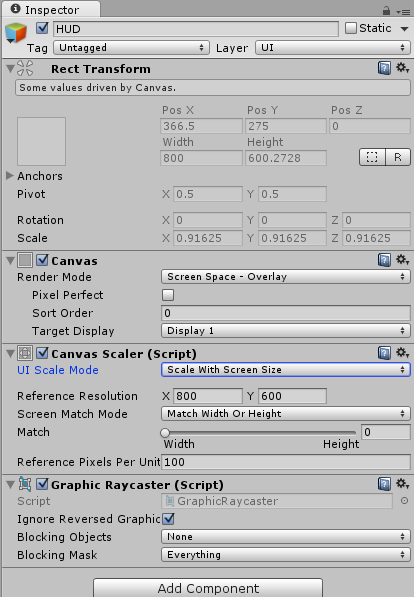
So load the Online scene and add a Canvas (GameObject->UI->Canvas), then rename it HUD and set the UI Scale Mode to ‘Scale with screen size’. Your HUD should look like this:-
Next we’ll add a camera to the HUD, so right click the HUD in the hierarchy window and select Camera from the drop down menu that appears. We are using the camera purely so we can see the UI elements in the game window in the editor, as it makes it easier to check positioning while we are designing things. This camera will get disabled in play mode.
Right click the HUD again and this time select UI->Text from the popup menu to add a child text object to it, then rename it HealthText. Then set the anchor to bottom left.
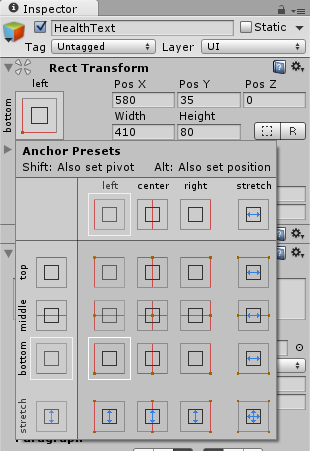
Now change the following other properties on the HealthText object you just added
- Pos X = 580
- Pos Y = 35
- Width 410
- Height 80
- Text = Health: 100
- Font Size = 64
- Alignment = Right
- Colour = White
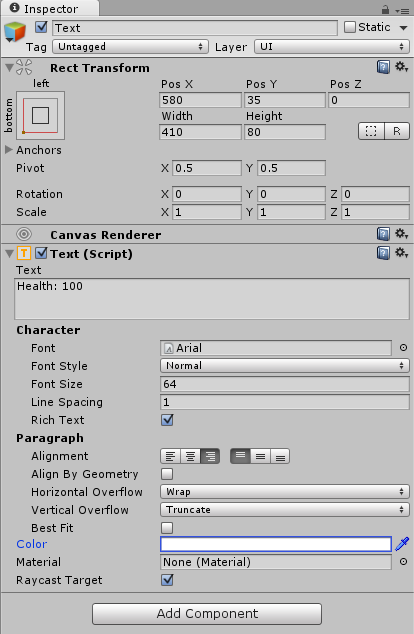
When you’re done your HealthText should be set up like this
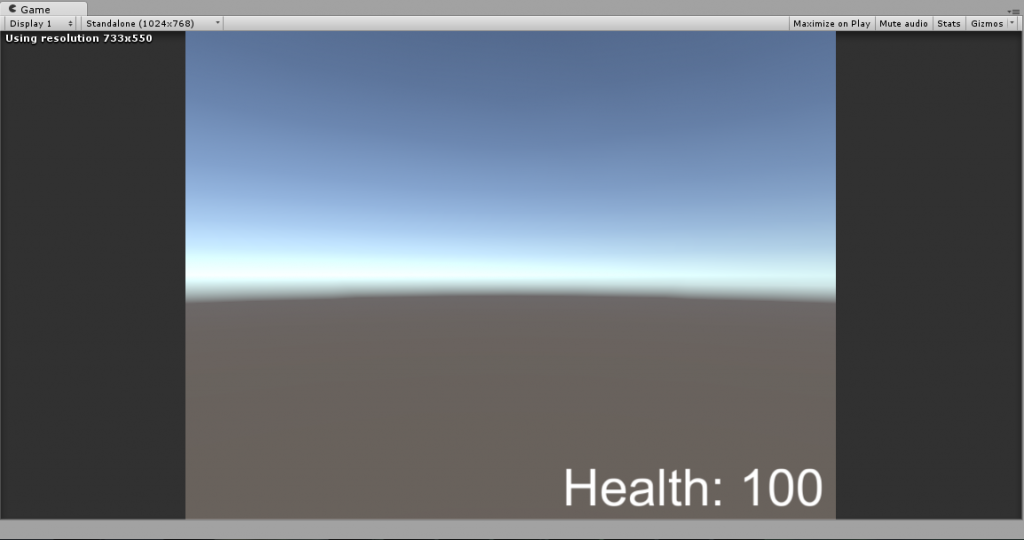
and your game display should look something like this
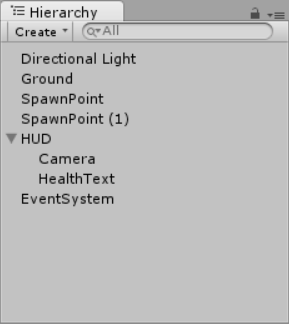
And your hierarchy should look like this:-
Now create a new folder in Assets and rename it HUD. Then create a new script in the HUD folder and rename it HUD too. Open this new script in your editor and replace the default code with the following:-
In this script, the first thing that happens is that during Awake it sets up a static singleton reference, and ensures that only one instance of the HUD can ever exist in any scene.
Then it gets and saves a reference to the HealthText object.
It has one other function, DisplayHealth() which as the name suggest displays our current health in the HealthText Text component of our HUD.
So now we have our HUD script we need to save it and drag it onto the HUD game object in the hierarchy.
Now all that remains is to make a small change to our HealthAndDamage script to make the HUD update as our health changes. So open up the HealthAndDamage script in the editor and add the following lines of code to the end of the OnHealthChanged() function
What this does is, first of all check if isLocalPlayer is true, as we only want to display the health as it changes for our local player. If it is, we call the DisplayHealth function on the HUD and pass it our current health. This will in turn update the text display as our health changes.
This is the full HealthAndDamage script with the above changes:-
Save the HealthAndDamage script, then save the Online scene and load the Offline scene. Now if you build and run the game, you’ll see the health displayed in the lower right hand corner of the screen and as you take hits from the laser from the opposing player your health will decrease in value and be displayed on screen.
There is no check for when it reaches zero yet, but we will fix that in the next tutorial, along with handling re-spawning and scoring.
See you next time.

Excellent tutorial so far. =D
Thanks Rodrigo,
glad you like it 🙂
I’m working on part 6 now, hoping to get it posted over the weekend or just after.
This is the full HealthAndDamage script with the above changes:-
[Should here be the scripts? Why I can not see them……]
Can I find the scripts from other site?
Save the HealthAndDamage script, then save the Online scene and load the Offline scene. Now if you build and run the game, you’ll see the health displayed in the lower right hand corner of the screen and as you take hits from the laser from the opposing player your health will decrease in value and be displayed on screen.
Hi buzheteng,
I’m not sure why you can’t see them, all the script examples are hosted on PasteBin, so they should be available to everyone. Is it just that code link that doesn’t work, or is it all the code examples?
This is the direct link to the raw paste data for the link you mentioned http://pastebin.com/raw/VNq788LQ
Does that link work for you?
shouldn’t your raycast in the fire function be done on the server, not the client? I new to networking, but i was under the impression the server should be responsible for hit detection?
Hi Priceless5386,
yes, in terms of reducing the risk of people being able to cheat, you would almost certainly want to implement hit detection on the server.
However, if there is any latency between the client and server, without decent client side prediction code being implemented, there will arise the situation where the player firing the missile sees a hit, but the server doesn’t, and vice versa. This kind of behaviour will soon become quite frustrating from the player’s point of view.
So sticking with my goal of keeping things as simple as possible for the sake of the tutorial, I decided to implement the hit detection on the client, working on the assumption that by the time anyone is advanced enough to be thinking about client side prediction code, they will also be advanced enough to know they need to handle hit detection on the server.
Thanks for your feedback though, I’ll update the tutorial with a note that mentions this.
that makes sense, but couldnt you also see that same problem with your current solution? Where there is latency between the players, but one machines is a hit the other isnt? To me, both solutions have a fault with out prediction, so why not go with the server anyway. sorry, i am not trying to be difficult, i am still learning this.
Taking in to account the target audience of the tutorial, and being mindful of keeping the core ideas as uncluttered as possible there were obviously going to be some compromises.
Where latency effects are unavoidable I always try to produce the best result on the local player, as that is where it is usually most noticeable.
I think you’ve maybe misunderstood the intention of the tutorial, it isn’t trying to demonstrate a cast iron networking solution for use in a production environment. Its sole purpose is to introduce the core commands and ideas in as uncomplicated a fashion as I could manage.
There are plenty of other tutorials available which will cover in depth client side prediction and various methods to reduce the visible effects of latency, but that wasn’t what my tutorial was for.
You’re obviously thinking about the right things though, and asking the right questions, which is half the battle when learning to write networked games.
Pingback: fifa 17 coins