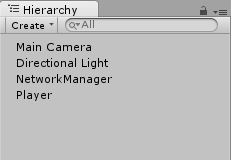
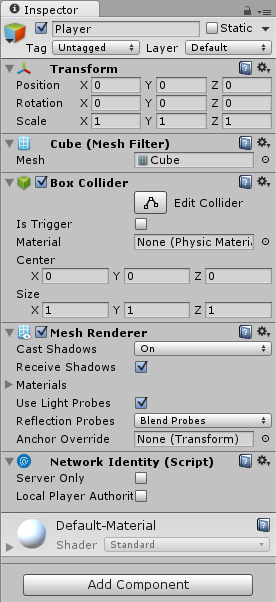
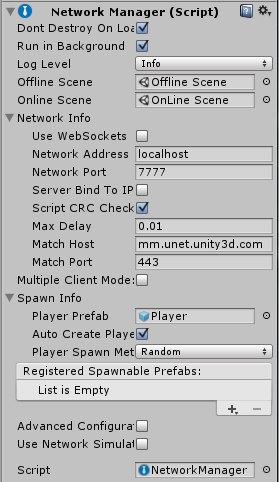
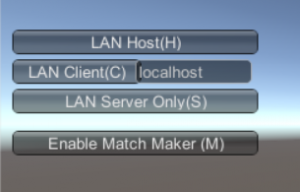
Scene Transition/Screen Fader Tutorial Part1

A common feature of games is that the screen briefly fades to black during scene changes. This is done to ‘soften’ the transition as a sudden switch from one scene to another can be a bit jarring if it’s visible when it happens.

So I’ve found it handy to have a screen fader that I can easily drop in to a new project any time I want to have fade to black (or some other colour) scene transitions and I decided that it would be a nice subject for a mini tutorial. It will also serve to demonstrate a couple of seemingly often overlooked but very useful features, i.e. callbacks and CanvasGroups.

The aim of this tutorial will be to provide a screen fader that is fairly simple to implement and is also flexible and easy to use.

The way this screen fader will work is by overlaying a UI image on the screen and changing it’s alpha value to fade it in and out.

To make it as easy as possible to add to a project, we’ll have the fader create its own UI elements in code, which means all we have to do is drop the screen fader script onto an empty game objet to make it available for us to use. To make this work we’ll need the screen fader to create its own Canvas, CanvasGroup component and an Image.

Step 1)
This is the code to create the Canvas at runtime:-

What this does is create a new GameObject with a Canvas component attached. It then parents it to the GameObject that script is on, then it sets the RenderMode to ScreenSpace overlay and sets the sort order to the value specified in the inspector (default 99). I have made the sort order easy to change so that you can make sure the fader image is always on top of everything else. However depending on what you wanted you could also use the sort order to have it appear behind some elements.)

Step 2)
This is the code to create the CanvasGroup at runtime:-

We use AddComponent() to add the CanvasGroup component to the canvas we just created, and then store, in a member variable, the reference to the component that it returns for later use. Then we set interactable and blocksraycasts to false, which means that any child objects of the canvas group won’t block mouse clicks. This isn’t strictly necessary for our purposes here, and indeed in some instances you may want your screen fader to block input, in which case you would set interactable and blocksraycasts to true.
Lastly we disable the GameObject as we don’t need to have it enabled until we are ready to use it.

Step 3)
This is the code to create the Image at runtime:-

Firstly we create a new GameObject with an Image Component attached, then we set it as a child of the canvas we created in step 1. Next we set its colour to the value specified in the inspector (default black), and lastly scale it up a bit, this last bit is done to prevent a slight border appearing around the edges in some screen resolutions.

Step 4)
Set the image position and size and make it scale with the screen size:-

The easiest way to change position and size of ScreenSpace UI elements is to use the RectTransform component, so firstly we get a reference to the Image RectTransform using GetComponent().

Next we set the anchors to the bottom left and top right to make the image stretch with the screen size. The anchors are Vector2s with values between 0,0 and 1,1, where 0,0 is the bottom left of the screen and 1,1 is the top right of the screen.
Next we centre the image by setting its anchoredPosition to 0,0;
Lastly we set the width and height to match the current screen size (due to the scaling we did in step 3, it will be slightly larger than the screen).

Now we need to put all of that above into the Awake function of the screen saver. This is the complete Awake() function.

The only part of the Awake() function I haven’t discussed yet is the very first block of code. Basically what this does is make the screen fader not get destroyed during scene changes, and also ensures that the only instance of it that can exist is the first one that is created. It also grabs a static reference to the first instance so that it is possible to access non static methods and properties.

That’s the basic setup finished, so next we’ll define a couple of static methods that will enable us to perform fade outs and fade ins. The methods will invoke callbacks when finished so that we can delay execution of other code whilst the fader is in operation. We will also be able to specify a delay before and/or after the screen fade.

This is the public static method to do a fade out:-

As you can see it is quite simple, all it does is check to see if the callback argument is null, and if so it points it to the default empty callback function and then it sets the canvas active.
Next it stops any current fade in/out operations (I’ll discuss that function further on) and runs the fade out coroutine, which is where most of the work is done.
It uses the variant of StartCoroutine that returns a CoRoutine object, which we store for use by the StopActiveFades() function.

This is the code for the fade out coroutine:-

There again, this is quite straightforward, first of all we yield wait for the delayBefore period.
Then we loop while the group.alpha property is less then 1. The alpha property controls the transparency of all children of the group (in this instance our image we created in step 3), a value of zero means fully transparent and a value of one means fully opaque.

In the while loop we use MathF.MoveTowards to linearly fade from transparent to opaque, we can use the speed property in the inspector to control how quickly this happens.
After the while loop exits we yield wait for the delayAfter period if any, and then we invoke the callback to signal that the fade is done.

The fade in functions are almost identical, except in the while loop we change the group.alpha from one to zero and when it’s finished it disables the canvas.

Now let’s take a look at the StopActiveFades() function:-

This function just ensures that there can’t be two fade operations running at the same time, as that could result in unwanted behaviour.
What it does is check the fadeInCR and fadeOutCR variables and if they aren’t null it stops the coroutine they point to and sets the variable to null.

Last of all is the default empty callback function, which doesn’t need any explanation.

In the next part of this tutorial I will show how we can use the screen fader in our applications, but in the meantime here is the full screen fader script:-

As always any and all comments are welcome, see you next time.

Generic Serialiser Class

It’s been a busy month what with one thing and another, so I haven’t managed to get finished the UNET custom NetworkHUD tutorial I’ve been working on, but I’ll post it as soon as I can.

In the meantime I’ve been doing some groundwork for an RPG idea we’ve had, and one of the first requirements is for an easy way to save and load the state of the various data classes we’ll be using. As this is something that also seems to get asked for on a fairly regular basis in the forums, I thought I’d share what I’ve come up with so far as it might prove useful to others in some situations.

The serialiser as it currently stands is quite simple, it has four static methods, two for serialising the data (one to PlayerPrefs and one as binary data), and two that read in the data and return it in an instance of the corresponding class.
It will serialise any class or struct that is marked as Serialisable and it even works with dictionaries.

This is the code for the serialiser class.

As an example, to save the state of a class to PlayerPrefs you would use something like this:-

To load the data back into the program you would use something like this:-

The way I actually tend to use it though is to wrap the serialiser calls into two methods on the class I want to serialise. An instance method for saving, and a static method for loading the data, which returns an instance of the class populated with the data.

So for example, i might define a PlayerInfo class something like this:-

And then from elsewhere in the program I would load and save the class data like so:-

The Load() function automatically handles the situation where there is no saved data yet, and returns a new instance of the class in that case.

I have made a simple demonstration program that allows you to type in a player name and add and remove items from the inventory. When you exit and restart the program you will see that the changes you made will have been preserved.

Using this generic serialiser it becomes a simple task to save and load even quite complex classes and structs, as long as you remember to mark them as serialisable.

Also remember that if you make any changes to the serialised class definition after you have saved it, you will most likely have to delete the saved data to avoid errors when it tries to load it next.

I hope this proves to be of use to someone, and as always any comments and suggestions are welcome.

You can try out the test program in a Unity WebPlayer here or download the project files here.

See you soon

Martin.

Arcade Style Bouncy Vehicle Physics Tutorial

What is this tutorial?
In this tutorial we will look at how to set up arcade style vehicle physics on a 3D model. As with my previous tutorial, in an attempt to keep it as clear and concise as possible I will keep the game design quite simple, therefore this should be seen as a basis from which to build a game, rather than a tutorial for a complete and finished game.

Who is this tutorial aimed at?
This is aimed at people with a reasonable knowledge of C# and Unity as I won’t be explaining in depth basic C# programming concepts or basic Unity concepts, unless it is appropriate to do so within the scope of the tutorial.

Part 1 – The vehicle game object

 As this is a tutorial on coding rather than building game objects in the editor, I’m not going to give step by step instructions on how to put together the car and terrain, instead I’ll just give a brief description of the important bits and how they relate to the code, and I’ll provide all assets in a download link at the end of the tutorial.

First of all I should point out that the method we will be using isn’t a realistic physics simulation, instead it uses forces to ‘fake’ the physics, but the outcome is reasonable and gives a nice Mario Kart style feel to the vehicle handling.

The way we’ll achieve this is by firing a raycast down from each corner of  the vehicle a certain distance (hoverheight), and if it detects a hit, it adds an upward force. We also adjust the strength of the upward force depending on the distance from the vehicle that the raycast detects the hit. So effectively the closer the vehicle gets to the ground the stronger it is pushed back away from it, and vice versa.

The length of the ray we fire can be adjusted, and the longer it is the further the vehicle will float above the ground, we will be using a fairly short ray, because we want this to appear as if it is actually on the ground. However by increasing the hoverheight and hoverforce you can simulate a nice hover car type behaviour instead.

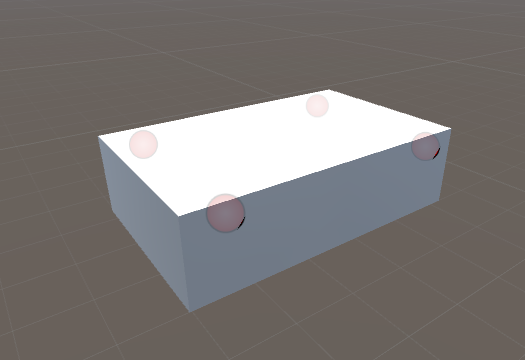
This is a very basic example of how we would set up the vehicle game object with the hover points. The red circles indicate where the hover points are positioned. Notice that they are placed vertically above the centre of the vehicle, this is because of the way we simulate gravity in our code, as I’ll explain a bit further on.

HoverCarBasic

We’ll also attach a rigidbody component, and for this example we’ll give it a mass of 70, drag 3 and angular drag 4. These figures work quite well as they are, but you can achieve different handling effects by tweaking them also.
Lastly we give it a box collider to detect collisions with other scene objects and also to prevent the vehicle from falling through the terrain when the downward velocity is very high and we’ll put it on its own layer (vehicle), so we can ignore it in the raycasts.
We’ll also untick Use Gravity, as we will be handling gravity ourselves.

So that’s pretty much all that’s needed for a basic vehicle setup (in the finished project I have added a buggy model which looks a bit nicer than a plain cube).

Part 2 – The code

So now let’s take a look at the code that will turn this into something a bit more interesting. First off we’ll add the various properties that we’ll use to control the behaviour of the buggy as so.


Most of this should be pretty self explanatory, but I’ll explain what some of them do.

The deadZone value is just a way to make the controller not so sensitive to small movements. Basically any input below the deadZone threshold is ignored.

The groundedDrag value is used to change the buggy RigidBody drag factor depending on whether the buggy is grounded or in the air.

The dustTrails array will hold references to the particle systems that play when the wheels are grounded.

The layerMask property is used to prevent the hover point raycasts from registering hits on the buggy.

Next we have the Start function, which stores a reference to the buggy Rigidbody and stores a reference to the inverse of its LayerMask, for use in the Raycast later.
It also sets the Rigidbody.centerOfMass to be one unit below the buggy, this helps to keep it a bit more stable when it’s in the air.

In the Update function we read the current input and assign a value to the acceleration and rotation from it.

Most of the work is done in FixedUpdate, so let’s take a look at this one bit at a time:-

This block of code above handles the hover/bounce behaviour.
To start with it clears the grounded flag.
Then, for each of the hover points, it fires a raycast of hoverHeight length downwards, and if it detects a hit it applies a force in the opposite direction and scales it depending on the distance the hover point is away from the hit point. So the closer the hover point is to the point which the ray cast hits, the greater the force that is applied to push it back. Kind of like what happens when you compress a spring.
Grounded is also set to true if any of the raycasts detect a hit.

If, however the hover point raycast doesn’t detect a hit, then that means this wheel/corner of the vehicle is off the ground, so we need to handle this differently as follows.

It compares the y position of each hover point with the y position of the vehicle, and pushes it up if it’s below it, or down if it’s above it. This serves two purposes, firstly it makes the vehicle automatically level out when it’s in the air, and secondly it applies a fake gravity effect. This is why the hover points need to be positioned above the centre of the vehicle transform, so that when the vehicle is in the air it will be pushed back down by the gravityForce amount. If we positioned the hover points below the y position of the vehicle transform, once it left the ground it would fly up into the air and never come down.

The next section of code handles other behaviour differences between when the vehicle is grounded and when it is airborne.

So basically, if the vehicle is on the ground, we set the Rigidbody.drag value to the amount we set in the inspector, and we give the dust trail particles a suitable emission rate.
But if the vehicle is in the air we set the Rigidbody.drag to a very low value, and we also drastically reduce the thrust and turn values, as we don’t want to have full control whilst we aren’t on the ground.
Lastly for this section, we iterate through the dustTrails array and set the particle emissionRate to the appropriate value (10 if grounded, zero if in the air).

Last of all we apply the thrust and turn forces to the vehicle and then limit it’s velocity to the maxVelocity value we set in the inspector.

So that’s the entire vehicle controller script, it produces quite a nice arcade style drive and with a bit more work could form the basis of a fun driving game, you can test out the complete project which can be downloaded from here. Once you have loaded it into Unity you will need to open Assets\Scene 1.

The behaviour of the vehicle can be modified to make it feel like it’s driving on different surfaces by changing the various properties exposed in the inspector, for example to make it feel like it’s on ice change the following properties:-

  • Grounded Drag = 0.5
  • Max Velocity = 30
  • Forward Acceleration = 1500
  • Reverse Acceleration = 750
  • Turn Strength = 500

It uses the standard WASD and Arrow keys to control acceleration, braking and turning.

Thanks to Carbon Concept for the free buggy model

I hope you enjoyed this tutorial, and please feel free to post any comments or suggestions.

Download project files

Unity 5 Network Tutorial Part 7 – Improved respawning and health pickups

Welcome to part 7 of my Unity 5 basic network game tutorial, in this, the final part, we will improve the respawn process and implement health pickups.

Part 7a – Improved respawn

In the last part of the tutorial, we implemented respawn behaviour when a player’s health reaches zero, however as it stands there is no delay between the player dying and being respawned, which dosn’t feel quite right. Also there is a subtle bug, whereby if the player dies close to his respawn point, you will see him ‘lerp’ to the respawn point on remote clients.
So we’ll go ahead and fix both of those issues now.

First of all, open the NetworkPlayer script in your editor and make the playerCam variable public.

public Camera playerCam

The reason for making the playerCam variable public is because we want to temporarily detach the camera from a player object when he dies. This enables us to reposition the player without the camera immediately following him. (This is a bit of a workaround to avoid the lerping issue mentioned earlier.

This is the only change we need to make to the NetworkPlayer script, so go ahead and save it, and then open the HealthAndDamage script in your editor, as we also need to make some changes there.

We’ll handle detaching and re-attaching the camera in the HealthAndDamage script, so we’ll store a reference to it in a variable in the HealthAndDamage script.
Add this line below the respawnPos variable:-

Camera playerCam;

And add this line to the OnStartLocalPlayer() function:-

playerCam = GetComponent<NetworkPlayer>().playerCam;

That’s the reference to the player’s camera sorted, so next we’ll add three new functions that will perform the improved respawn.

Add the following code just below the GetRandomSpawnPoint() function:-

So looking at these new fuctions, we have setVisibleState(bool state), what this does is turn on or off the player object renderer and name label, effectively making it invisible or visible depending on the state argument.

Then we have a coroutine, HandlePlayerDeath() which calls setVisibleState with a value of false, which makes all instances of the player object invisible.
Next, only if it’s running on the local player, it detaches the camera, preserving the camera’s current position, and then it repositions the player in the respawn position. As the camera is now not parented to the player, the game view stays in the position it was when the player died, and then it waits for two seconds. This is good for two reasons, first it gives a nice pause between dying and respawning and secondly it allows the clients to lerp to the new spawn position whilst they are invisible, so you don’t see it happen.
Finally it calls the Respawn() function.

The Respawn() function checks to see if it’s running on the local player, and if it is, it re-parents the camera to the player object and sets it’s local position to the correct value.
Then it tells the server to reset the player’s health to 100. Finally it makes the player visible again on all PCs on the network (which is why the last command needs to be outside of the isLocalPlayer check).

The final change we need to make is to the RpcHandlePlayerDeath() function, to make it call the HandlePlayerDeath() coroutine instead of handling the respawning itself. So replace the existing RpcHandlePlayerDeath() function with this new one:-

So that’s the new and improved respawn procedure finished, this is the new HealthAndDamage script with all the above changes implemented:-

Save this and then build and run the game, you will see that after a player dies he disappears for two seconds before reappearing at one of the spawn points with full health.


Part 7B – Health Pickup

Now let’s add a health pack that you can walk over to replenish your health. We’ll implement these as scene objects, so we can just place them in the editor and not have to worry about runtime instantiation and health spawn points etc. etc.

So the first thing we need to do is create a health pack game object. Open the online scene and add a 3d Cube game object (GameObject->3D Object->Cube) and rename it HealthPack.
Now make the following changes to the HealthPack game object:-

  • Set its transform.position to  -8,0.25,-5
  • Set its scale to 0.5,0.5,0.5.
  • Add a NetworkIdentity component to the HealthPack (with the HealthPack game object selected use the menu option (Component->Network->NetworkIdentity)).
  • Set its Box Collider Is Trigger property to ticked

Next we’ll give it some colour; Open the Assets/Materials folder, create a new material in there and rename it HealthPack, then set the albedo Colour to a nice bright green.
Then drag this new material onto the HealthPack game object in the hierarchy and you should see the cube take on the colour of your new material.

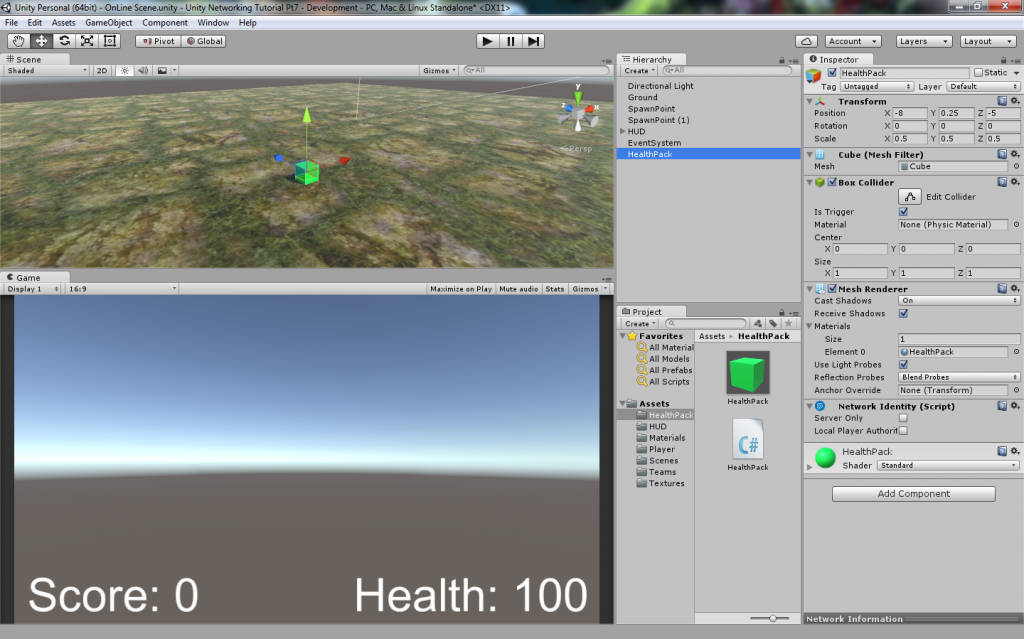
Your scene setup should look like this after you have done all the above.

Now let’s add a script to the HealthPack game object to implement the functionality. Create a new folder in Assets and rename it HealthPack, and in that folder create a new c# script and rename it HealthPack. Then open the Healthpack script in your editor and replace the default code with the following:-

This is a fairly straightforward script with only five functions, also notice that it derives from NetworkBehaviour instead of MonoBehaviour. Now let’s take a look at each part in turn and I’ll explain what each one does.

Firstly we declare a variable, bool visible, and make it a SycVar with a hook function. The hook function OnVisibleChanged just activates or deactivates the attached Renderer and Collider based on the newValue argument. This has the effect of hiding or showing the health pack in the scene. Anytime the value of visible is changed this hook function will run and update the state of the HealthPack in the scene.

Next we have OnStartServer(), this will only ever run on a dedicated server when it starts, or the host when it starts. Therefore we can use this function to set the initial state of the HealthPack, and as we want all health packs to start enabled we set visible to true.

Next comes OnStartClient(), this runs on all clients when they join the game, and at this point all SyncVars are guaranteed to have the correct synchronized value, so we manually call the visible hook function, passing the current value of visible, so we can update the state of the health pack in our scene. This ensures that if a health pack is hidden on the server at the time we join the game, our local copy also gets hidden.

Then we have the HandlePickup() coroutine.

All this does is set visible to false, which makes the hook function run, which hides the health pack.
Then it waits 15 seconds and then sets visible to true, which makes the health pack visible and available for use again.
We can make direct changes to the visible variable as this script is running on the server.

Lastly comes OnTriggerEnter(Collider other)

By default, this function runs on all clients whenever a trigger collision is detected, however we only want to handle collisions with the HealthPack on the server. We could ensure this in a couple of ways, either by checking if isServer is true, or (and this is how we do it) with the use of attribute tags.
The use of the [Server] tag, would mean that the function will only run on the server, however as we can’t control when this function is invoked, we can’t prevent clients from calling this function, and although the function won’t run on the client, we would get a console littered with debug warnings. Therefore instead of using the [Server] attribute, we’ll use the [ServerCallback] attribute, which still makes it only run on the server, but also supresses the warning messages if the function is called from the client.

So having ensured this will only run on server, what does it do. Firstly it starts the HandlePickup coroutine as described above, to hide the health pack.
The ‘other’ argument, will contain a reference to the player game object that collided with the HealthPack, so we use GetComponent to access its HealthAndDamage script and add 10 points to its publicly exposed health variable.
There again we can do this directly as this script is running on the server.
This is where the power of SyncVars shows, because this updated health value is now automatically sent to all clients and because we had previously set up a hook function for the health variable, it in turn updates the health display on the HUD. So just by changing the value of the health variable everything automatically synchronizes and updates, very neat!

Save the HealthPack script and add it to the HealthPack game object by dragging it onto the HealthPack in the hierarchy window.

Then save the Online scene, and the open the Offline scene. You can now build and run the game and test the HealthPack.

So now we have a working health pack, which when a player walks over it will add some health and disappear, before respawning again 15 seconds later. You can duplicate the health pack game object as many times as you like and position them around your game scene.

There are a couple of obvious things about the health pack that could be improved, such as preventing it from increasing health above 100, and also stopping the player from flashing yellow when he picks up a health pack when he is below 100 health. But I’ll leave those as an exercise for you to figure out.

So that’s it for this tutorial series, I hope it’s proved understandable and useful and I’ll do my best to answer any questions that might arise.

You can download the complete Unity project files here:-
Unity Networking Tutorial

Unity 5 Network Tutorial Part 6 – Score and Respawning

Welcome to part 6 of my Unity 5 basic networking tutorial, in this part we will add scores and respawning.

Part6a – Death and respawning

In the last part of the tutorial, we left it where a player’s health reduced when hit by a laser shot, but it didn’t detect when it reached zero. So we need to address that now.

Firstly open the HealthAndDamage script in your editor and change the replace the TakeDamage() function with the following new TakeDamage() function.

What this does is prevent the health value from going below zero.
Then if it is zero it calls the DoDeath routine to take the appropriate action, which in this case will be to move the player to one of the spawn points and reset their health to 100.

We need to add the DoDeath() function next, so add this code just below the TakeDamage() function.

We also need a new SyncVar to store the respawn point in, so add this code just below the health SyncVar.

All the above bits of extra code do is call another two functions, which we will add next, one to obtain the new spawn point, which is then stored in the respawnPos syncvar and the other is an RPC to move the player to the respawn point.
We mark the DoDeath() function with the [Server] attribute as we only want respawning to be handled on the server.

Add this code just below the DoDeath() function, this is what we will use to get a new spawn point, it makes use of the spawn points we set up in the NetworkManager previously.

Lastly we need to add the HandlePlayerDeath() function as so

This is the function that does most of the work of respawning our player. Firstly we check isLocalPlayer, as we only want this to run on the local player object (it will automatically synchronize the changes to remote clients).
Then we reset our position to the respawnPos value obtained earlier, and finally we tell the server to set our health back to 100.

This is the entire HealthAndDamage script as it now stands

Save this and build and run the game, you will see that when a player’s health reaches zero, it is instantly respawned in one of the spawn points and it’s health is restored to 100.

Part 6b – Scoring

The only thing left for this part of the tutorial is to handle scoring when a player gets a kill. So we’ll sort that out now.

Firsly we need to update the HUD to give it a way of displaying our score. So open up the Online Scene, and with the HUD game object selected add a Text object (GameObject->UI->Text) and rename it ScoreText, then make the following changes to its properties:-

  • Anchor = Bottom Left
  • Position = 223, 35, 0
  • Width = 410
  • Height = 80
  • Text = Score: 0
  • Font Size = 64
  • Colour = white

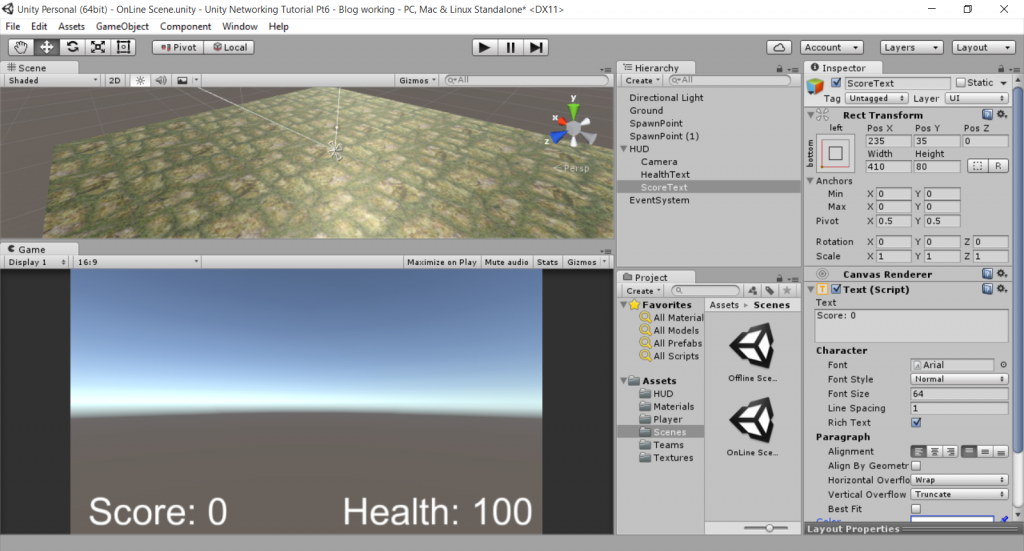
Once you’ve done that your Online scene should now look like this
ScoreText
Now we’ve got somewhere to display the score, we need to add some code to actually do that, but before we go on, save the scene with the above changes.

With the scene saved, the next thing we need to do is add a reference to the ScoreText game object and a new function to the HUD script. So open the HUD script in your editor.
Then add this line just below the healthText variable

Text scoreText;

Now add this line to the Awake() function

Now add the function that we can use to display the score for the player as it changes.

The entire HUD script should look like this now:-

Next, open up the HealthAndDamage script in your editor and add the following line to TakeDamage() function:

fromPlayer.GetComponent<PlayerShoot>().AddScore();

so the TakeDamage() function should now look like this:-

This calls the AddScore function on the player that fired the laser, if the targeted player’s health is zero, i.e. he is dead.
We now need to make the AddScore function as it doesn’t actually exist yet. So open the PlayerShoot script in your editor and add the following code beneath the CanFire() function:-

We also need to declare a variable to store the player score in, so add this line just below the nextFireTime variable:-

int score;

We are only interested in keeping track of the player’s score on the local player, so the score variable doesn’t need to be a SyncVar.
The AddScore function has to run on the server, as it invokes the RpcAddScore() RPC function we just added.

In the RpcAddScore() function we check it its running on the local player, as this is the only place we want to update the score, and if it is, we add 5 to the current score and then call the HUD.DisplayeScore() function we made earlier, to display the new score.

This is the entire PlayerShoot script with the above changes implemented:-

Save the PlayerShoot script and the HUD script, load the offline scene and then build and run the game. Now when you shoot and kill an opponent, you will see your score increase by 5 each time.

That’s it for part 6, in the next part we’ll improve the respawn function to add some delay and add health pick up items.

Unity 5 Network Tutorial Part 5 – Health and Damage

Welcome to part 5 of my Unity 5 basic networking tutorial, in this part we will add damage and health, so at least your laser will have some purpose now!

Before we get to the laser, I want to make a small change to the NetworkPlayer script, with the addition of two lines. So open the NetworkPlayer script in your editor and add these two lines to the OnPlayerIDChanged() function:-

name = playerID;
if(isLocalPlayer) name += “ Local“;

This makes it much easier to identify whether you are dealing with your local player object, or the player object belonging to a remote player, when it comes to debug.logging etc. It’s a little trick I use when programming a multiplayer game, and can be a real time saver when trying to pin down why something isn’t working as it should.

The OnPlayerIDChanged function should look like this now

Save the changes and then we can move on to the laser, making it do some damage.

Part 5a – Laser hit detection and health

So the first thing we need to do is enable the laser to detect if it has hit another player. We’ll use a ray cast for this and therefore we need to add these lines to the beginning of the Fire() function in the PlayerShoot script:-

What this does is fire a ray in the same direction and length as our laser LineRenderer and, if it detects a hit, it calls the server function CmdDoShotSomeone() and passes references to both the player that was hit, and the player that did the shooting, so that the server can take the appropriate action. Which in this case will be to reduce the health of the player that was hit.

Again, to keep things simple there is no checking done to determine if the object that was hit is actually a player. For this tutorial that’s all it can ever be, but in practice you’d probably want to make certain with some tag checking etc.
Also in terms of reducing the chance that players can cheat, the hit detection really ought to be carried out on the server. However, without extra client side code being implemented, this could result in it looking like shots miss, when the client sees a hit, but due to the latency, the server doesn’t register a hit and vice versa. So for this tutorial I’ve decided to ignore the possibility of cheating and implemented it the way that will give the best player experience, whilst keeping the code as simple as possible.

However, we do need to make the CmdDoShotSomeone() function, so also in the PlayerShoot script, add the following function just below the Fire() function

This gets a reference to the HealthAndDamage script on the player that was hit, and calls the TakeDamage() function that will reduce the players health. It also passes a reference to the player that did the shooting, as this will be needed later. We can’t call this function directly from our Fire() function because we don’t own the hitPlayer gameobject; it belongs to another player in the game, therefore the only way we can interact with it is via the server.

The full PlayerShoot script should look like this now, save this (ignore any errors regarding the HealthAndDamage script being missing) and we’ll move on:-

Now we need to make the HealthAndDamage script, as at the moment it doesn’t exist.
So in the Assets/Player folder create a new script and rename it HealthAndDamage. Open it in your editor and replace the default code with the following:-


So going through this one bit at a time, first of all we declare a variable to store our health in, and make a SyncVar with a hook, OnHealthChanged().

Lets take a look at the hook; What this does first is update the health variable to reflect the new value, then it checks to see if health is less than 100. If it is then that means we have taken some damage, so we should show some kind of feedback to indicate this, and to do that we start a coroutine ShowHitEffect().

ShowHitEffect is quite simple, it gets a reference to our player object’s material, saves the current value of its colour, and then sets its colour to yellow, waits for a short time and then resets the colour using the previously saved value.
So basically, when you get shot, your player flashes yellow briefly.

In OnStartLocalPlayer() we call the server command CmdSetHealth, passing in a value of 100, this sets our starting health when joining the game. Because of the ‘If(health<100)‘ check in the hook function, changing our health like this won’t trigger the hit feedback effect when the health value changes. If we didn’t have that check in place, we would flash yellow when our health was initialized to 100 when we joined the game.

The remaining function is the TakeDamage function, which reduces our health by 10 every time it is called. It is this function that is called by the PlayerShoot script, when a hit is detected.

With all the changes above made, save your script and then add it to your player prefab, by dragging the script onto the prefab in the project window.

Now if you build and run the game and start a host and client, you’ll see that every time you score a hit on your opponent he flashes yellow. If you run one game in the editor you can also check the value of health in the inspector for each player, as it was declared as a public variable, and you’ll see it reduce as you score hits.

Part 5b – HUD

Now we need some way to display our health on screen, and the way we’ll do this is with a scene object HUD.

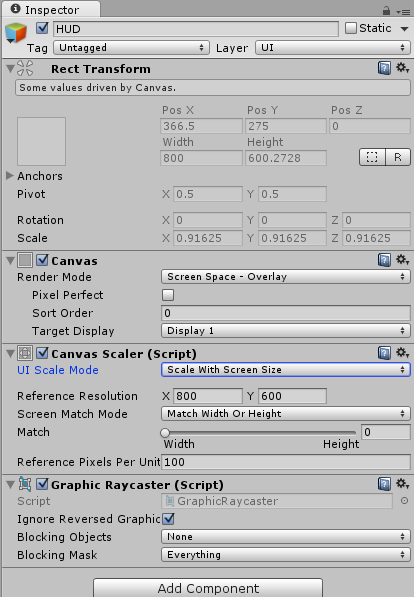
So load the Online scene and add a Canvas (GameObject->UI->Canvas), then rename it HUD and set the UI Scale Mode to ‘Scale with screen size’. Your HUD should look like this:-

Hud

Next we’ll add a camera to the HUD, so right click the HUD in the hierarchy window and select Camera from the drop down menu that appears. We are using the camera purely so we can see the UI elements in the game window in the editor, as it makes it easier to check positioning while we are designing things. This camera will get disabled in play mode.

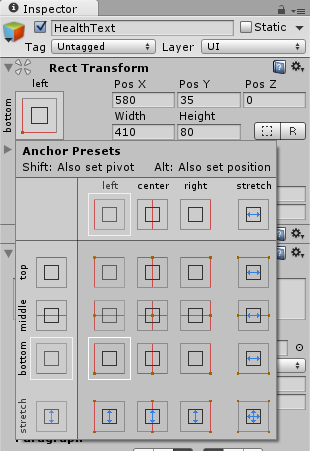
Right click the HUD again and this time select UI->Text from the popup menu to add a child text object to it, then rename it HealthText. Then set the anchor to bottom left.
Anchor

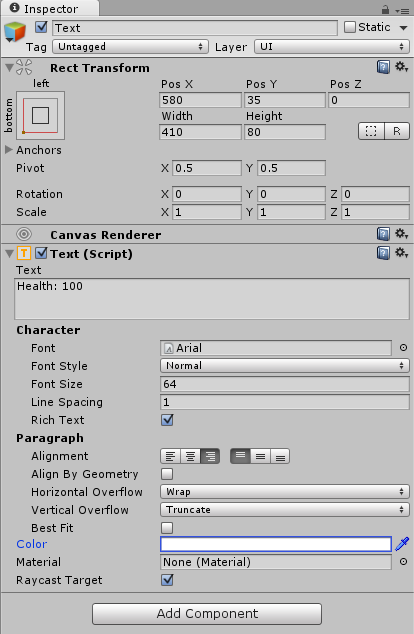
Now change the following other properties on the HealthText object you just added

  • Pos X = 580
  • Pos Y = 35
  • Width 410
  • Height 80
  • Text = Health: 100
  • Font Size = 64
  • Alignment = Right
  • Colour = White

When you’re done your HealthText should be set up like this

HealthText

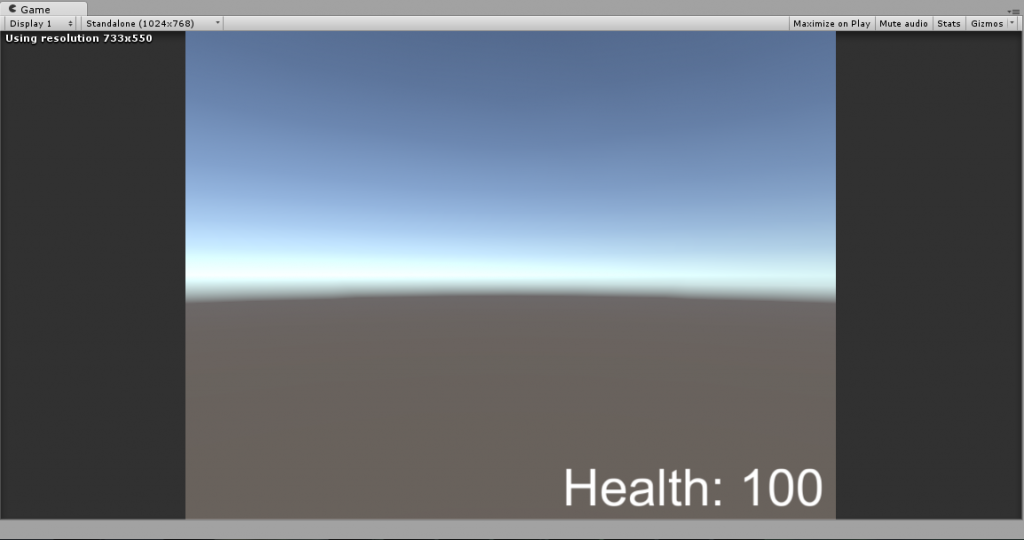
and your game display should look something like this

GameDisplay

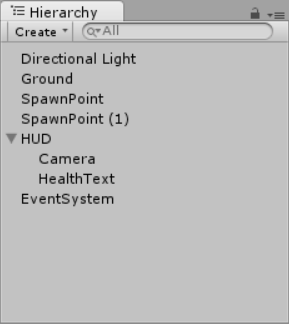
And your hierarchy should look like this:-

Hierarchy

Now create a new folder in Assets and rename it HUD. Then create a new script in the HUD folder and rename it HUD too. Open this new script in your editor and replace the default code with the following:-

In this script, the first thing that happens is that during Awake it sets up a static singleton reference, and ensures that only one instance of the HUD can ever exist in any scene.
Then it gets and saves a reference to the HealthText object.

It has one other function, DisplayHealth() which as the name suggest displays our current health in the HealthText Text component of our HUD.

So now we have our HUD script we need to save it and drag it onto the HUD game object in the hierarchy.

Now all that remains is to make a small change to our HealthAndDamage script to make the HUD update as our health changes. So open up the HealthAndDamage script in the editor and add the following lines of code to the end of the OnHealthChanged() function

What this does is, first of all check if isLocalPlayer is true, as we only want to display the health as it changes for our local player. If it is, we call the DisplayHealth function on the HUD and pass it our current health. This will in turn update the text display as our health changes.

This is the full HealthAndDamage script with the above changes:-

Save the HealthAndDamage script, then save the Online scene and load the Offline scene. Now if you build and run the game, you’ll see the health displayed in the lower right hand corner of the screen and as you take hits from the laser from the opposing player your health will decrease in value and be displayed on screen.

There is no check for when it reaches zero yet, but we will fix that in the next tutorial, along with handling re-spawning and scoring.

See you next time.

Unity 5 Network Tutorial Part 4 – Team Colours and Shooting

Welcome to part four of my Unity 5 basic network game tutorial, in this part we will cover automatically assigning players a team number and colour, and also give them the ability to fire a laser.

If you have been following this tutorial up until now, please note that I omitted a line of code from the OnPlayerIDChanged function of the NetworkPlayer script. I’ve updated that now, with an explanation of the what the extra statement does, so you may want to go back and check it out.
For convenience here is the updated OnPlayerIDChanged function.

Part 4a – Basic team manager

To handle assigning player colours and team names, we’ll create a basic team manager for the game. As with most aspects of this tutorial, I’m going to keep it simple, so the implementation of the team manager doesn’t dwarf the networking concepts I’m trying to demonstrate.

To start with open the Offline scene, create an empty GameObject and rename it TeamManager. Then make a new folder in Assets and call it Teams. Create a new script in the Teams folder, rename it TeamManager and drag the new script onto the TeamManager game object in the hierarchy.
Open up the TeamManager script for editing and replace the default code with the following:-

The awake function handles the task of making sure there can ever only be once instance of the TeamManager.

The function we are really interested in is the SetPlayerTeam function, we will call this every time a new player joins, and pass it a reference to the new player game object.
We then get a reference to the NetworkPlayer component on player game object and set the public teamNumber based on the value of TeamManager.playerCount variable.
Then we increment the value of playerCount, so the next player to connect will be on another team.

Also note the use of the [Server] attribute on the SetPlayerTeam function. What this does is ensure that this code will only run on the server, and will generate a warning if we try to run it on a client. As this function makes changes to player objects it has to run on the server.

So far so good, but at this moment we don’t actually have a teamNumber variable on our NetworkPlayer script, so we need to make that now, and as you’ve probably already guessed this will be a syncvar with a hook function.

So we need to make a few small additions to our networkPlayer script. Open it in your editor by double clicking the NetworkPlayer script in the Assets/Player folder and add the following line beneath the playerID variable:-

[SyncVar(hook = “OnTeamChanged”)] public int teamNumber;

This is where we store our team number for this player, and we will use the hook function to update the appearance of our player depending on what team he is allocated.

Now add the function that we will use to tell the server to change the value of this variable.

Next add this line to the end of the OnStartLocalPlayer function

    CmdSetTeam(gameObject);

And add this line to the end of the OnStartClient function

    OnTeamChanged(teamNumber);

Finally add the hook function

What this does is firstly store the new teamNumber value in our copy of the variable and then it sets our player material colour to either red or blue, depending on the value of teamNumber.

That’s all there is to it, when a player joins the game, it calls the CmdSetTeam function which in turn  calls TeamManager.SetPlayerTeam on the server, which as previously explained allocates a team, so players will be alternately assigned to team zero or one (red or blue) as they join the game.

The OnstartClient function makes sure that other players already in the game are correctly updated in your copy of the scene.

Like I said this isn’t a robust example of a team manager, and won’t guarantee balanced team sizes, but for the purposes of this tutorial it is sufficient to illustrate the basic idea.

This is the full NetworkPlayer script with all the above changes incorporated:-

Once you have incorporated all the above changes, save the script and build and run the game and you will see that the first player to connect changes to red, and the second player is blue, subsequent players connection will alternate between the two colours.

Part 4b – Shooting

Now we’ll give the players the ability to fire a laser (I’ll cover bullet projectiles in a later tutorial).

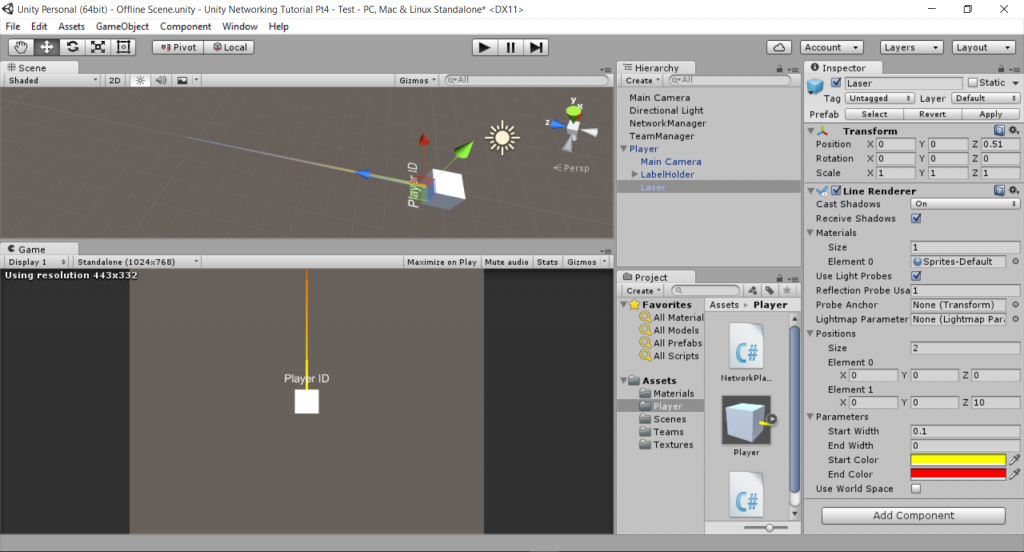
So the first thing we need to do is prepare our player prefab for this. Begin by dragging the player prefab into the Hierarchy and then with it selected add an empty GameObject as a child (GameObject->Create Empty Child) and rename it Laser.
Select the Laser game object and add a LineRenderer component (Component->Effects->LineRenderer) then  expand the Materials, Positions and Parameters sections, by clicking the small triangle to the left of their headings.
Next, change the following properties on the LineRenderer

  • Transform.Position = 0,0,0.51
  • Positions->Element 1 = 0,0,10
  • Start Width = 0.1
  • End Width = 0
  • Start Colour = Yellow
  • End Colour = Red
  • Use World Space = false (unticked)

Then click the small circle to the right of the Element 0 property in Materials, and in the material selector dialog that opens, double click the Sprites-Default material to select it and dismiss the dialog.

Apply the changes to your player prefab, and it should look like this:-

So now we have a laser, we need a way to use it. In the Assets->Player folder, create a new script and call it PlayerShoot. Open it in your editor and replace the default code with the following and save it:-

Drag the saved PlayerShoot script onto your Player prefab in the hierarchy to add it as a component. Now apply the changes to the player prefab and you can delete it from the Hierarchy.

I’ll explain the important bits of this script.

OnStartClient()
In this we get and store a reference to the line renderer, then disable the line renderer so that it isn’t visible as soon as we start, and finally disable the script, which will have the effect of disabling the script for all clients when they join the game.

OnStartLocalPlayer()
In this function, all we do is re-enable the script for the local player, this means that our player object will be the only player object in the scene that has this script running. Otherwise we would have multiple player objects firing when we pressed the fire button, instead of just our own.

Update()
In the update function, we check to see if the fire button was pressed, and also if we are ready to fire again, and if so we call the Fire function.

Fire()
We do two things in this function, firstly we start the ShowLaser coroutine to display the laser effect on our own PC.
We do that here so that the laser is displayed instantly rather than waiting for a response from the server, which otherwise could give the game a ‘laggy’ feel.
However, we also need to tell all the other clients to display the laser fire on their instance of our player object, so that they too can see we fired our laser.
This is where an RPC (Remote Procedure Call) comes in handy, an RPC is a way to run a function or method on a remote PC. But only the server can issue RPC calls so we can’t call it directly, we need to do it via a Cmd function.

So we use the CmdShowLaser function to call the RpcShowLaser function, and this latter function is then executed on all connected client PCs.

In the RpcShowLaser function, the first thing we need to do is determine if this is running on our local player object or the player object belonging to another client.

Basically, if isLocalPlayer is true, that means we fired our laser, and as we have already displayed the laser effect on our PC during the Fire() function, we don’t need to do it again and can just exit the function.
However if isLocalPlayer is false, then that means that someone else fired their laser, and they are telling us that we need to display the laser effect on our copy of their player object, so we start the ShowLaser coroutine.

ShowLaser()
All this does is enable the Laser LineRenderer for 1/10th of a second and then disables it again.

Lastly the CanFire() function just adds a little delay to how often we can fire.

With this script on the player object and the player prefab saved, if you then build and run the game you will see a brief laser flash in front of the player when you press the left mouse button.

Sadly at the moment this laser is completely ineffective as a weapon, so in the next part of the tutorial we’ll add player health and damage.

See you next time.

Unity 5 Network Tutorial Part 3 – Camera control and name labels

Welcome to part 3 of my Unity 5 networking tutorial.

In this part we will give the players their own name and name tag, and we’ll make the camera follow the player that you are controlling.

Part 3a – Synchronizing the PlayerID

To keep things simple we are going to automatically generate a unique name for each player that joins the game, rather than let the user specify one. So first of all we need to decide on a way to obtain a unique identifier for each player.
Luckily the Unity networking system provides us with an easy way to do this, by virtue of the NetworkIdentity.netId. Every networked GameObject is allocated a netID number by the networking system, which is used by Unity to keep a track of that object, and as the netId is unique for every gameObject we can make use of that.

So with that in mind create a new script in the Assets/Player folder and name it NetworkPlayer. Double click the new script to open it in MonoDevelop (or whichever editor you use) and replace the default code with the following code.

The job of this script is to detect when the player joins the game, and then generate and store a unique name for said player.

First of all, note that like the PlayerNetworkMove script we wrote in part 2, this is also a NetworkBehaviour, rather than a MonoBehaviour.

Then, next we have

[SyncVarpublic string playerID;

Basically this is a variable like any other, except that it has a [SyncVar] attribute (Synchronized Variable). What this attribute does is make sure that any time the variable’s value is changed, the new value is automatically sent to all connected players. Furthermore, whenever a new player joins, they receive the current value of that variable for all the other players already in the game.
In this case, we are going to use this variable to store the unique player name we generate later in the script, and as mentioned this will be automatically synchronized with all the other players so they will be able to see our name.

Let’s look at the next bit now, the CmdSetPlayer method.

[Command]
void CmdSetPlayerID(string newID)
{
     playerID = newID;
}

If you remember in Part 2 of the tutorial I mentioned that only the server can make changes to networked objects, well, this is a case in point, we want to be able to change the playerID, so we need a way for the server to change it for us. In order to do this, we need to create a method that updates playerID and give it an attribute, the [Command] attribute. Essentially what this does is make sure the following function will only be run on the server. We also need to follow a specific naming convention for a server command, specifically it has to start with Cmd.

In this example, all the CmdSetPlayer method does is set the playerID value to the value of the newID argument, and because of the [Command] attribute this can only run on the server. Once the value of the variable has been changed, the [Syncvar] attribute of the variable means that the new value will propagate to all connected clients.

So now we come to the final part of the script.

public override void OnStartLocalPlayer ()
{
    string myPlayerID = string.Format(“Player {0}”, GetComponent<NetworkIdentity>().netId.Value)
   
CmdSetPlayerID(myPlayerID);
}

This function is called on network player objects (but only on the client that owns the player), when they join the game. What this means is, that when you join the game, the OnStartLocalPlayer function will run on your player game object on your PC, but not on the game object representing your player on anyone else’s PC.
First of all it retrieves the player’s netId, which is a uInt value, and constructs a string in the format ‘Player n’ (where n is the netId value).
Then it calls the CmdSetPlayerID method, passing in the new playerID, which instructs the server to change the value, this new value is then sent to all connected clients (including the one that made the call) and their copy of playerID is updated with the new value.

Add this script to the player prefab in the Assets/Player folder, by dragging it onto the prefab, or using the Component menu (Component->Scripts->NetworkPlayer) and then save the scene.

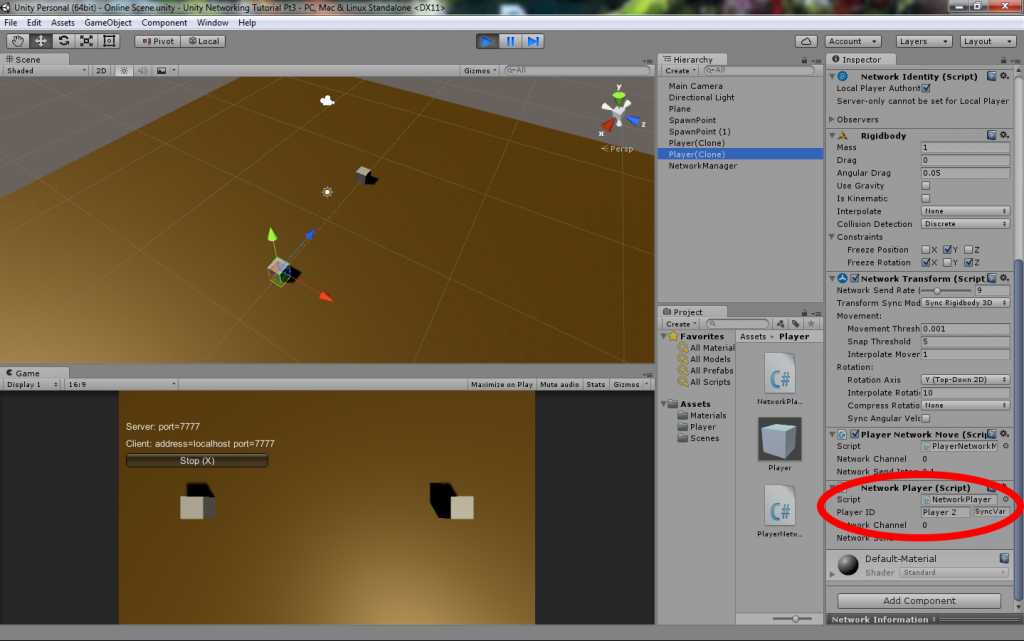
If you build and run the game now and run one instance in the Editor and one instance in standalone, windowed mode, you will be able to see this working.
With a host running and a client connected you can check the player(clone) game objects in the inspector, and you will see that the exposed playerID syncvar has a different value for each player.
PlayerIDSyncvar


So far, so good, but what we actually want is for the playerID to be displayed in the game, so that ourselves and other players can see it. However, before we do that I want to deal with the camera, and make it so that it follows your player as you move, we’ll come back to the playerID label afterwards.


Part 3b – Setting up the camera

The first step in setting up the camera is to load the Online scene, this is important, because if you do the following steps with the Offline scene loaded you’ll end up with no camera on the menu and two cameras in the game scene.

So, with the Online scene loaded, drag the player prefab from the Assets/Player folder into the Hierarchy window, to create an instance of it in the scene. Then we need to drag the Main Camera game object onto the player game object you just created, so that the camera becomes a child of the player, and make sure its transform settings are set to Position (0,10,0) and Rotation (90,0,0) like so:-
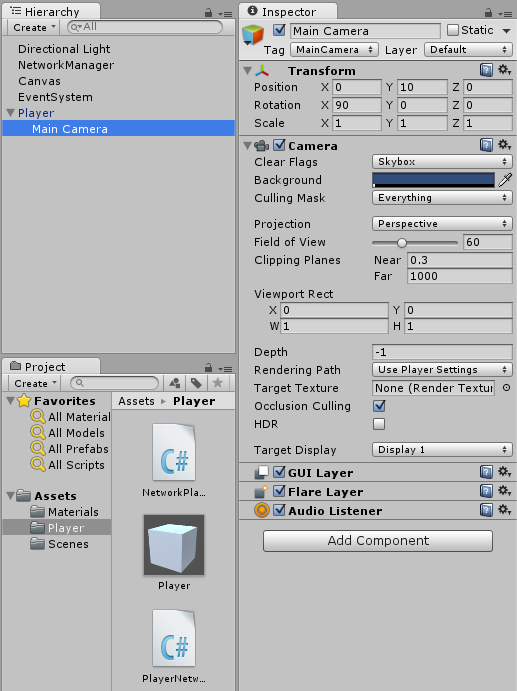
PlayerCamera


Once these changes have been made, we need to click the Apply button on our player game object in the hierarchy, to save the changes to the prefab.

PrefabApply

Once the changes have been applied go ahead and delete the player game object from the hierarchy. You will notice in the Game window there is a message saying that the scene is missing a fullscreen camera, you can safely ignore this for our purposes.

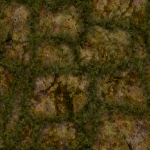
One further change I’d like to make, is to add a texture to the ground material we made in part 2, as this will make it easier to see that the players are moving, compared to how it would be with a featureless brown ground surface. So to do this, firstly create a new folder in Assets and call it Textures. Then download this texture (Click on the picture or the link below it to open it in your browser, then right click and select Save Picture As…)groundTexture
http://www.doofah.com/tutorials/wp-content/uploads/2016/02/groundTexture.png

Once you have saved the texture to your PC, copy it into the textures folder you just made. You can also, if you wish, use instead any suitable texture you may already have.

Next, select the GroundMaterial in the Assets/Materials folder, and click the small circle just to the left of the word Albedo in the inspector.
This will open the Select Texture dialog… MaterialAlbedo
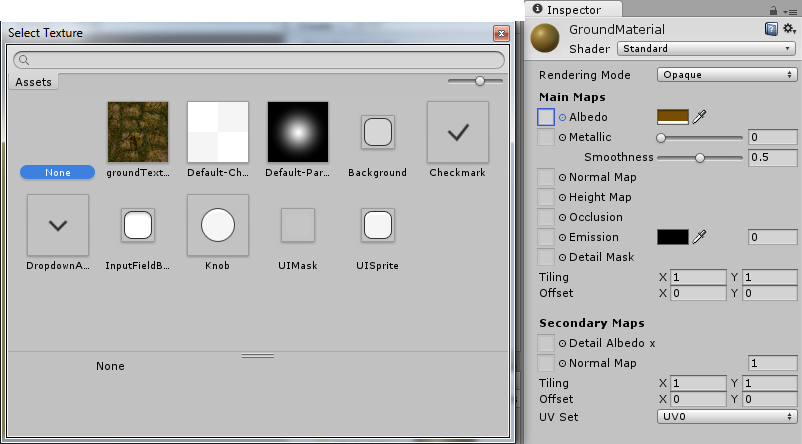
…within which you should see the groundTexture you just downloaded. Double click the groundTexture to apply it to the material and dismiss the dialog.
Then set the albedo colour to white and lastly set the X and Y tiling values for the Main Map both to 5, so the texture isn’t stretched quite so much. Your Ground Material should look like this now…
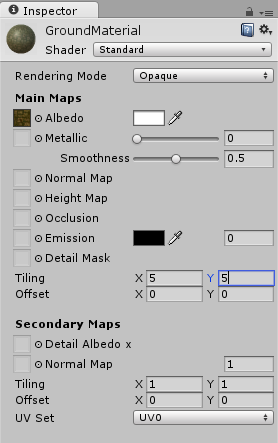
… and your ground plane should have a nice tiled texture on it.

Now, save the scene and re-open the Offline scene.

If you build and run the game, and start a server and client, you’ll notice that there is some strange behaviour; Namely on one client the camera doesn’t move when you move the player, but if you move the other player, the camera moves in both clients. This is because both player objects in the game have their own camera and they are fighting for control. We can however, fix this with a small change to the NetworkPlayer script.

So to fix the camera problem, open the player script in MonoDevelop and just below the playerID variable add a private variable of type Camera and call it playerCam and below that add an Awake function like this :-

Camera playerCam;

void Awake()
{
    playerCam = GetComponentInChildren<Camera>();
    playerCam.gameObject.SetActive(false);
}

What this does, is as soon as any player object is created (local player or otherwise), it gets a reference to the attached camera and then disables it, which is ideal for player objects that belong to other players, but not so good for our own player, on our own player we want the camera to be enabled. To manage this we can make use of the OnStartLocalPlayer function again by the addition of the following line

playerCam.gameObject.SetActive(true);

which is just the opposite to what we did in the Awake function, and re-enables the camera, but because we are doing it in the OnStartLocalPlayer function, it only happens for the player object we are controlling. So the overall effect is that the only camera that is enabled is the one that is on the player object we are controlling. Also a side effect of disabling the Camera GameObject rather than just the Camera component, is that we don’t need to specifically disable the associated AudioListener as it is automatically disabled along with the camera.

This is the entire NetworkPlayer script as it should now look.

If you build and run the game now, you will see that the camera now works as it should, i.e. it only follows the local player as it moves. Now we have the camera working how we want, it’s time to sort out the playerID label as previously promised.


Part 3c – Add The Player ID label

What we’d like is a label that displays every player’s unique playerID and one way to achieve this is to use a TextMesh component.

So first off, drag the player prefab into the hierarchy to create an instance of it. Create a new empty game object (GameObject->Create Empty), rename it LabelHolder, drag it onto the player game object to parent it to the player game object and make sure its position is set to 0,0,0 and it’s rotation is set to 0,0,0.

Then create another empty GameObject and rename it Label,  then drag this onto the LabelHolder  gameobject to parent it to the LabelHolder . Next ,select the Label game object and add a TextMesh component (Component->Mesh->Text Mesh).

Your player should now look like this :-

PlayerHierarchy

Now we need to change some of the default properties of the TextMesh we just added, so with the Label game object selected,
Set the Position to 0,0,1
Set the Rotation to 90,0,0
Set the Text Mesh Text property to “Player ID”
Set the Character Size to 0.2
Set the Anchor to Middle center
Set the Font Size to 24

Then select the player game object and click apply to save the changes to the player prefab.

Once you’ve done all that your player label should look like this in the inspector. (Note that when the prefab was saved the rotation.x was subject to some floating point rounding error, so isn’t exactly 90 any more).
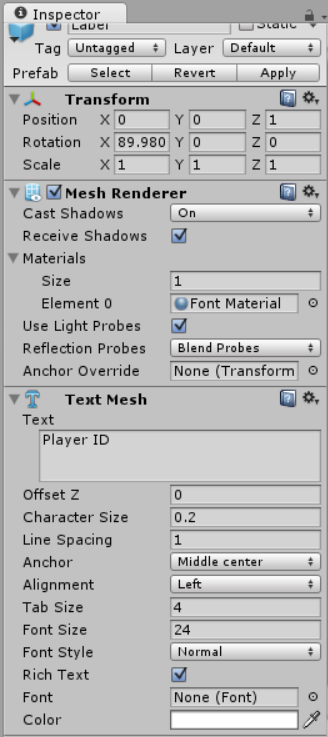
TextMesh
Having saved the changes to the player prefab you can now go ahead and delete the player object in the hierarchy window.

If you build and run the game, you should see that each player has a name tag above them with the default text “Player ID”. So all we need to do now is make it show the correct playerID and also tidy up the way the labels are rotated for other players that you can see.

The easiest way to stop the player labels from rotating as the players move around, is to stop both the camera and the labels from rotating at all, and we can do that in the NetworkPlayer script.

Open up the NetworkPlayer script for editing, and add the following under the playerCam variable, this gives us somewhere to store a reference to the label holder.

    Transform labelHolder;

Then add the following line to the Awake function, this gets a reference to the label holder that we can use later.

    labelHolder = transform.Find(“LabelHolder”);

Finally add an Update function to the script as so

    void Update()
    {
        if(isLocalPlayer)
        {
            playerCam.transform.rotation = Quaternion.Euler(new Vector3(90,0,0));
        }

        labelHolder.rotation = Quaternion.identity;
}

The update function first does a check to see if it’s running on the local client, and if it is it resets the rotation of the camera, (we are only interested in our own camera).

Then for all player objects in the scene it sets the label holder rotation to zero.

The net effect of this is that regardless of how the players move and rotate, all the labels will stay in place above the player, which makes it much easier to read them.

This is the new version of the NetworkPlayer script with all the above changes included.

Part 3d – Setting the name label text

Now we come to the final bit of this part of the tutorial, setting the label text to match the playerID.

We already know that the playerID is set when the player joins the game and that the value is synchronized to all players, however we then need a way for each player object to update the state of its components (in this case the TextMesh.text property) to reflect the change in the playerID variable. We can achieve this in one of two ways, either by using RPCs (Remote Procedure Calls) or by using a syncvar hook function, and for this task we’ll go with the hook function. I’ll cover RPCs later in the tutorial series.

Basically a syncvar hook function is a function that is automatically invoked on all clients whenever the associated variable is changed, and then we can make changes to the clients game object based on the value of the variable, in this case we will set the TextMesh to show the new name.

To set up our playerID syncvar to use a hook we first need to create the function that it will call when the variable value changes, like so :-

    void OnPlayerIDChanged(string newValue)
    {
        playerID = newValue;
        var textMesh = labelHolder.Find(“Label”).GetComponent<TextMesh>();
        textMesh.text = newValue;
    }

As you can see this is quite a simple function, its task is to locate the TextMesh component on the player object and then set its text to the new value passed into the function.
Also note that  the first statement assigns the new value to the playerID variable. if this step is omitted when using hook functions,  then when a player joins a game his copy of remote clients won’t have their version of that syncvar updated, which could lead to problems later on.

Now if you build the game and run a host in the editor you will see that your player’s name label is set to ‘Player 1’, and then if you run another instance of the game and join as a client, in the editor the 2nd player has the name ‘Player 2’. So that’s all as expected, the SyncVar has sent the new value of the second player’s playerID to the first player and both player objects have updated their labels.

But wait! If you check the player objects on the client instance, the player you control has the label ‘Player 2’, but the other one still has the default ‘Player ID’ text, so the hook function hasn’t been called for any player objects that were already in the game when you joined.

On the face of it, this looks like a bug, however Unity have confirmed that it is intended behaviour as explained by seanr on the Unity forums, much more concisely than I could

SyncVar Hooks are for changes in state, not for initial state. There is the OnStartClient callback for handling initial state.

There is no context during a SyncVar hook, so if they were called for initial state, the client would not be able to tell the difference between initialization of a variable and a change in the value of a variable. This causes un-expected results.

For example, for a “[SyncVar] int health” with a SyncVar hook that causes a client-side “blood-spurt” effect when the object takes damage, the object would play the blood-spurt for any objects with non-maximum health when joining a game in progress. The hook would be called with the new health value, which is different from the default health value, so the object thinks it has taken damage – so it plays its blood-spurt. But this is not what should happen. Setting the initial health of the object to its current value from the server should NOT play the effect.

This applies to all kinds of state changes, such as animation state, particles, etc. Initialization is different from incremental changes and the client-side code needs to know which is happening.

So with that in mind we need to add one more simple function to the NetworkPlayer script to override OnStartClient as follows :-

    public override void OnStartClient ()
    {
        OnPlayerIDChanged(playerID);
    }

And that’s it, all this does is pass current value of playerID to the OnPlayerIDChanged function, so that it can update the text on the TextMesh. The values of SyncVars on objects are guaranteed to be initialized correctly with the latest state from the server when this function is called on the client.

This is the full version of the NetworkPlayer script as it stands

If you save this and then build and run the game you should see that the labels are displayed correctly for all players on all clients and they stay horizontal above the player, no matter how it moves and rotates.


That’s it for part 3 of the tutorial  – in the next part we will cover setting up team colors for the players and shooting.

Unity 5 Network Tutorial Part 2 – Online scene setup and player movement

Welcome to part 2 of my Unity 5 basic network game tutorial. In this part we will set up the online scene, handle spawning the players in differing locations, and enable moving them based on player input.

Part 2a – Online scene setup

Before we start on the player movement it will be a good idea to re-design the Online scene so that we have a (very) basic game arena in which our players can do battle. Feel free to embellish this scene as you see fit to make it more interesting.

Go ahead and load the Online scene (double click Online Scene in the Assets\Scenes folder) and save any changes to the existing scene if prompted.

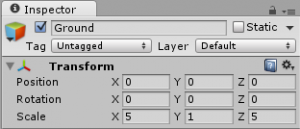
With the Online scene loaded let’s make the ground. Create a plane (GameObject->3D Object->Plane) and rename it Ground, then set it’s transform settings to these values:-

Next, let’s give our ground a bit of colour.

  • Create a new folder in your assets folder and name it Materials.
  • Double click the new folder to open it, and right click in the empty window, then from the popup menu select (Create->Material) and rename the new material GroundMaterial.
  • With the Ground material selected, in the inspector click on the colour selector to the right of the Albedo setting and change it’s colour. I went with a nice brown colour (RGB value 122,78,0).
  • Lastly, left click and drag the Ground material from the Project Window onto the Ground plane in the scene view, and you should see your new colour applied to the ground.

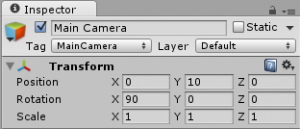
Now we should sort out the camera. This is going to be a top down game, so for the time being let’s move the camera into a position that better suits this (eventually the camera will be attached to the player object). With the Main Camera selected change it’s transform settings to the following:-

CameraTransform

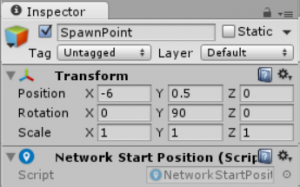
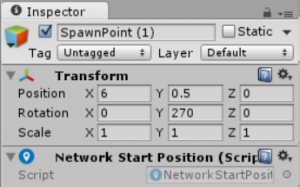
The final thing for our game scene is to create a couple of spawn locations for our players (you can in fact make as many of these as you like). Add an empty GameObject to your scene (GameObject->Create Empty) and rename it SpawnPoint. Now add a NetworkStartPosition component to it (Component->Network->NetworkStartPosition) and set its transform settings as follows:-

SpawnPoint

Now make a duplicate of this SpawnPoint and set its transform settings as follows:-

SpawnPoint2

The network manager will use these GameObjects to set the spawn position for players when they join the game.

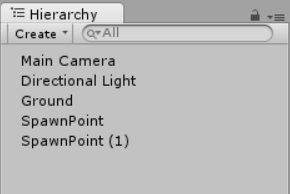
Your Online Scene hierarchy should look like this now:-

OnlineSceneHierarchy

At this point it’s probably a good idea to save the scene (File->Save Scene) to avoid the risk of losing all our hard work so far.

If you switch back to the Offline scene, run the game and start a host, you will see a much more obvious scene change now.

While we are at it we can make one more small change to the NetworkManager. Under Spawn Info change Player Spawn Method to Round Robin. This means that players will be spawned at consecutive spawn points rather than randomly chosen ones.

Part 2b – Player movement

Now we’ve come to the part where it gets a bit more interesting and we even need to write a bit of code! But before we do that let’s first stop to talk about a bit about how the Unity networking system works.

The Unity networking system introduced in Unity 5 (often referred to as UNET), is what’s known as a server authoritative system, which simply put means that only the server PC can make changes to networked game objects, and it then propagates those changes to all connected clients.

To give an example, if a player picks up a health pack, it sends a command to the server telling it so, and then the server can update the health (by an amount decided on the server) for that player object, on all connected clients. This prevents possible cheating, because if the client was allowed to update it’s own health it could, in the hands of an unscrupulous player, be made to add more health than it should. By having only the server handle this sort of thing it makes the game far less prone to cheating.

Hopefully that all makes some kind of sense! But in any event it leads me onto a change we want to make to our player object. With the system as I have just described it, if we want to move our player, we would have to send the new position to the server and then wait for it to send back an update before our player would actually move.
Therefore, you would be in a situation where you pressed a movement key and your player didn’t respond instantly, this can make the game feel very laggy, with anything but the lowest of latency. So ideally we would like to be able to update our position ourselves so we get instant visual feedback, and then have our new position sent to all the other players.
This is where the LocalPlayerAuthority setting of the NetworkIdentity component comes into play. By setting this to true, we can make changes to our own player without having to wait for the server to do it for us.

So before we do anything else let’s sort that out. Select your player prefab (in the Assets/Player folder) and in the inspector tick the LocalPlayerAuthority box.

LocalPlayerAuthority

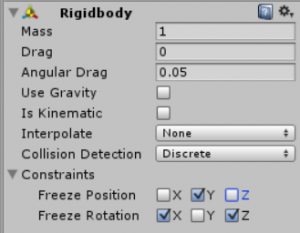
Next, with your player prefab still selected, add a RigidBody component (Component->Physics->RigidBody). untick Use Gravity and set Constraints as follows:-

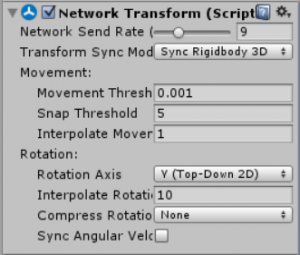
Now we need to add to the player a network component that will do the work of synchronizing our player’s position and rotation across the network. So with the player prefab selected, add a NetworkTransform component (Component->Network->NetworkTransform).

We need to check that the Transform Sync Mode is set to Sync RigidBody 3D, and we need to change the Rotation Axis to Y (Top Down 2D) as that is the only axis we will be rotating on, and it saves sending unnecessary network data. We’ll also change the Interpolate Rotation value from 1 to 10, otherwise the rotation on remote clients is very slow to catch up.

Your NetworkTransform component should look like this:-

PlayerNetworkTransform

Now comes some code, create a new script in the Assets/Player folder and call it PlayerNetworkMove and paste this code into it replacing the default code then save the file.

Now we need to add this script to the player prefab, so with the player prefab selected use the Component menu to add the script (Component->Scripts->PlayerNetworkMove) or just left click the script and drag it onto the player prefab.

This is a fairly simple script that reads keyboard input and the uses the result from the WASD key presses to rotate the player and move it forward and backwards in the direction it’s facing. Whilst this works perfectly well for a single player game, you will see if you build and run the game and run a host and client, that you have problems with it in a multiplayer game. As you move and rotate one player the other player also moves and rotates. This is because the PlayerNetworkMove script is running on every instance of the player in the scene. So we need to make a couple of changes to fix this.

Firstly we need to add UnityEngine.Networking to the list of using statements at the top of the code and then we need to change our class type from MonoBehaviour to NetworkBehaviour.

Making these changes gives us access to all the new networking features introduced in Unity 5.

Next we need to make sure that we only read the input from the local player  and only manually move the player object owned by the local player. As our script is now a NetworkBehaviour, it has a boolean property called isLocalPlayer, which will only be true for scripts that are running on the client that owns the player object. So we can check the value of that and act accordingly.

Change the Update function to this

This checks to see if the script is running on the local player, and if not it just returns without doing anything else, otherwise it gets the player input as before.

We also need to add the same check to the FixedUpdate function, as so

If the script isn’t running on the local player, fixed update will return without doing anything, otherwise it will move the player as before.

The player position and rotation for the local player is automatically synchronized with all the other clients by the NetworkTransform component we added earlier, so we don’t have to worry about that.

This is the full network aware PlayerNetworkMove script

With this script on the player object, you can build and run two instances of the game and start a host and client. You’ll see two cubes in the scene, both of which can be controlled independently of each other, and as you move a player in one client it is updated in the other client.

That’s it for part 2 of the tutorial, in the next part we will make the camera follow the player, and give each player its own name and name label.

Unity 5 Network Tutorial Part 1

Part 1

What is this tutorial?
This tutorial aims to demonstrate the basic concepts needed to create a multiplayer game. In an attempt to keep it as clear and concise as possible I will keep the game design quite simple, therefore this should be seen as a basis from which to build a game, rather than a tutorial for a complete and finished game.

Who is this tutorial aimed at?
This is aimed at people with a reasonable knowledge of C# and Unity, but little or no experience of network game programming. As such I won’t be explaining in depth basic C# programming concepts or basic Unity concepts, unless it is appropriate within the scope of the tutorial. I also won’t be delving too deeply into the complexities of networking, I’ll just explain enough to cover what we do in the tutorial which should hopefully give enough information to go on from here.

Notes
For the Unity editor layout I will be using the default Tall layout (Window->Layouts->Tall), but with the Game Window docked beneath the Scene Window, however you are free to use whichever layout you are most comfortable with.
Any names I suggest for things such as project names, scene names and gameobjects etc. are completely arbitrary, and you can change them if you wish. However if you do change them you need to make sure you also change any references to them that may come up later in the tutorial to avoid errors.
For ease of following this tutorial I would suggest you probably just go with my names for now.

Part 1a Setting up the project and scenes

  1. Start by creating a new 3D project and call it Unity Networking Tutorial.
  2. Create a folder in Assets, and name it Scenes
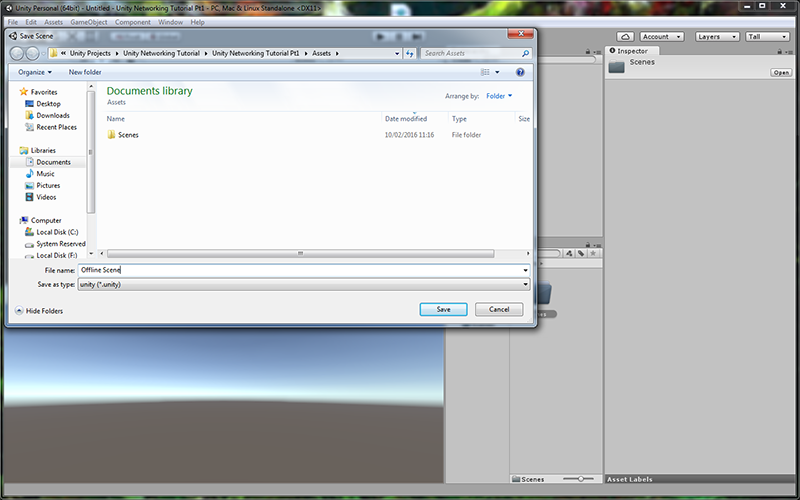
  3. Save the current scene into the Scenes folder, and name it Online Scene
  4. Save the current scene again into the scenes folder, but this time call it Offline Scene

SaveScene

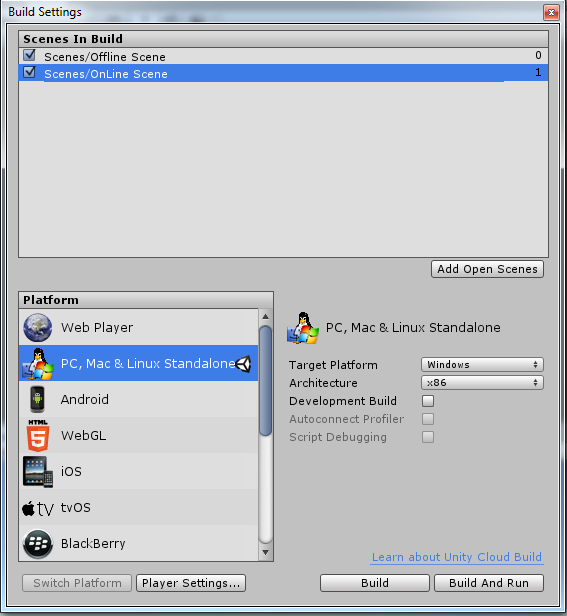
Now add the Offline and Online scenes to the build settings, if we don’t do this we will be unable to use them with the NetworkManager in the next step.

BuildSettings

Part 1b Setting up the NetworkManager scenes

Now we’ve got the empty scenes saved and added to the build settings, we need to start populating them with gameobjects. The first thing we need is a Network Manager, which fairly obviously manages the network, so we’ll add that now.

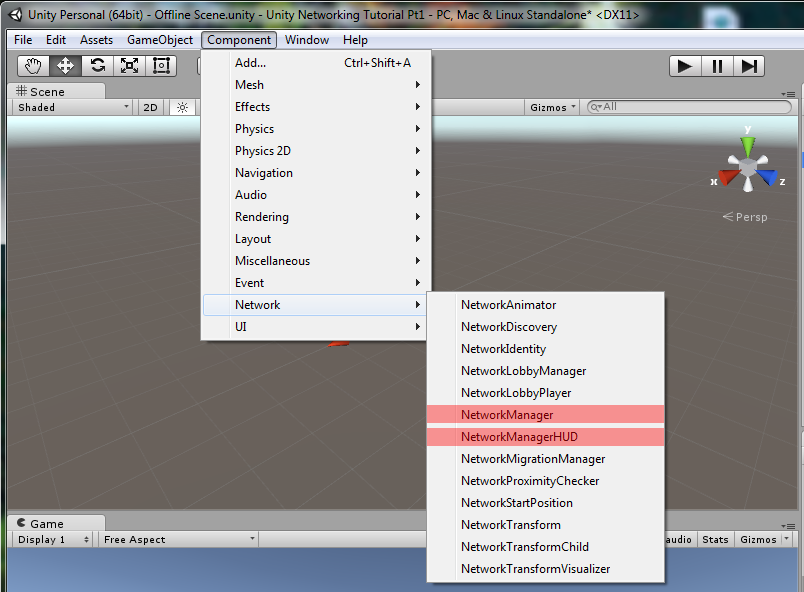
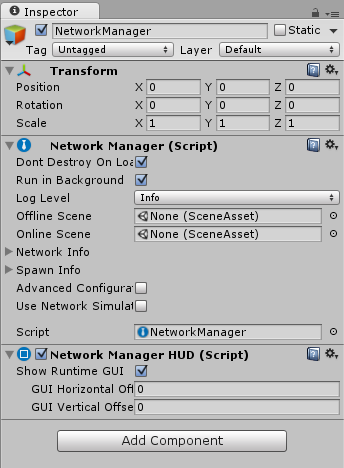
With the Offline scene open (it should already be open, if you followed the above instructions), create an empty gameobject (GameObject->Create Empty) and rename it NetworkManager. Now with the NetworkManager gameobject selected in the hierarchy use the Component Menu to add a NetworkManager and NetworkManagerHud component.

ComponentMenu

NetworkManagerComponentsOnce you have added these components your NetworkManager gameobject should now look like this.

The NetworkManager component will handle the nitty gritty of the network connection between all the players, and has various settings exposed in the inspector, only some of which we need to worry about for this tutorial.
I’ll cover these as we go along and explain what they do.

The first thing we need to look at in the NetworkManager is the Offline Scene and Online Scene settings.
The Offline Scene is where we will show the menu that will allow players to host or join a game, and the Online scene is what will load when the player joins a game (either as a host or client). This switching of scenes is handled automatically by the NetworkManager.
Strictly speaking there is no need to have separate scenes for this, however by doing so you will save yourself some possible headaches later.

So with that in mind, go ahead and drag the Offline Scene from the scenes folder in the project window and drop it onto the Offline Scene entry in the NetworkManager, then do the same for the Online Scene and drop that into the Online Scene entry in the NetworkManager.

The NetworkManagerHUD is solely for the purposes of displaying a basic menu that allows hosting and joining of game sessions. I intend to make another tutorial at a later date that shows how to implement your own UI instead.

Part 1c Setting up the player prefab

Now we have set the scenes up, we need to create a gameobject that will be our player in the game. For this tutorial we will just use a 3d Cube which we can create using the menu option GameObject->3D Object-> Cube.
Once you have added the cube to the scene, rename it to Player and set it’s transform and rotation to 0,0,0 if it isn’t already.

PlayerSceneHierarchyYour scene Hierarchy should now look like the picture to the left.

Before your player object can be used in a network game it has to have a NetworkIdentity component attached to it. The NetworkIdentity component controls an object’s network identity, and it makes the networking system aware of it.

Attach a NetworkIdentity component to your player by selecting the player and then using the menu item Component->Network->NetworkIdentity.

Your player should now look like this…

PlayerNetworkIdentity

Now we need to create a prefab of the player object, so firstly create a new folder under Assets and name it Player, then drag your player object into this folder to create a prefab of it there. You can now delete the original from the Hierarchy.

Now we need to tell the NetworkManager about your player, so it can spawn you into the game when you start a host or join a game.
To do this, find the Spawn Info section of the game manager and if necessary, expand it by clicking the small triangle to the left of the words Spawn Info.
Under Spawn Info you will see an entry for Player Prefab. Drag the player prefab you just created into the Player Prefab slot in the NetworkManager.

Your NetworkManager should now look like this

NetworkManagerPlayerPrefab

At this point, we’ve got the bare minimum needed to run the game and host or join a session.
You can test this now if you like. If you run the game you will be presented with a menu (courtesy of the NetworkManagerHUD component) that allows you to host a game, join a game or start as a server (ignore the matchmaker option for the time being).

NetWorkHUD

If you build the game you can run two instances of it and host a game in one, and join the game in the other.

For now all that will happen is that the menu will change to show the connection status and a disconnect button, and you’ll see a cube in the centre of the game scene (both player objects spawn exactly on top of each other). Not so obviously, the active scene will have also changed to the Online scene you created at the start of the tutorial.

That’s everything for Part 1 of the tutorial, without writing a single line of code we have the basic framework of a multiplayer game up and running!

In the next part we will set up the online scene, handle spawning the players in differing locations, and enable moving them based on player input.